Wednesday, June 10, 2026
My approach to the system design challenge: BeautyOfCloud 2.0 USJP
Posted by
Introduction
Back in the first week of June, I found myself at the University of Sri Jayawardenepura for the third session of the BeautyofCloud 2.0 series. The session was led by Mr. Savin Kodithuwakku, and the main topic on the table was how Instagram actually works under the hood.
The real highlight of the day, though, was a challenge he threw at us. Build system architecture completely from scratch. To sweeten the deal, there was a reward announced for the first design, which definitely added some serious motivation!
Think of this as the behind the scenes, look at how my brain tackled that challenge. So, let’s scroll down and dive into how I mapped it all out.
Understanding the Challenge
Before I could even start sketching out the architecture, I had to make sure I fully understood what was being asked. The challenge was to design a system with provided architectur diagram which contains core components like microservices, database, load balancer, Api-Gateway, cdn and more.
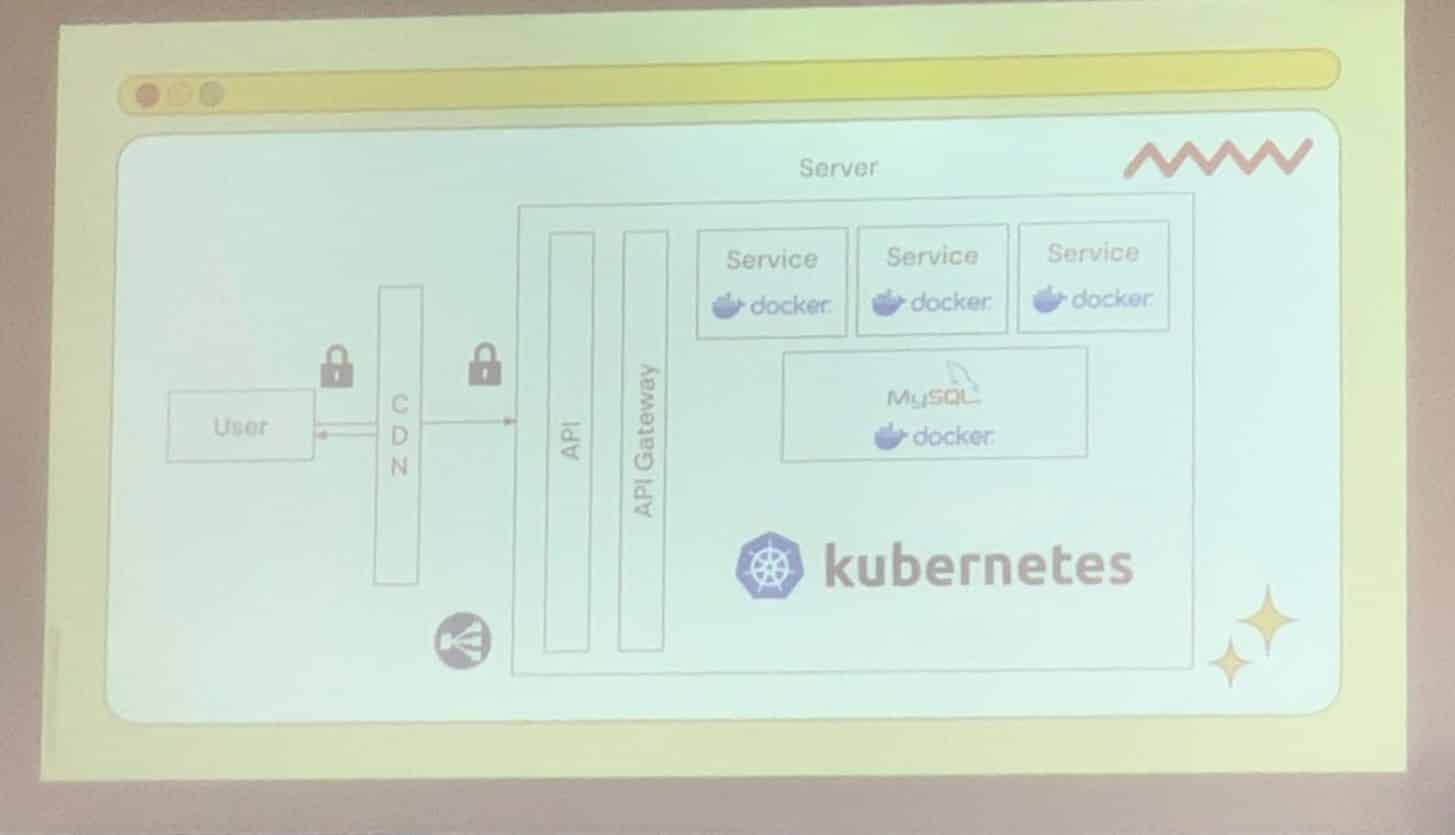
So to demostarte requirments, I planned to come up with project call
Coureses-no-one-asked-for aka CNOAF which is a online course platform
that publish best selling developer courses where users can enroll in
courses.

Core Architectural & HLD
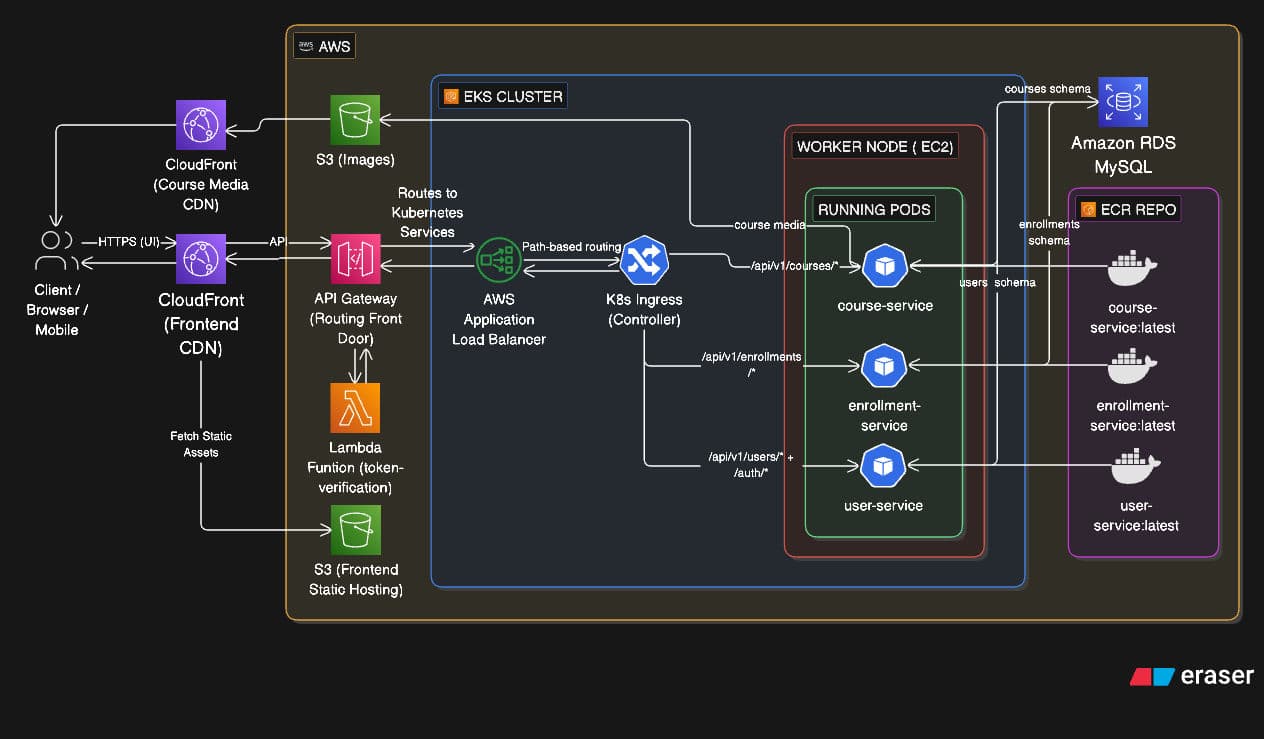
The system is built on a decoupled microservices architecture using Spring Boot (User, Course, and Enrollment services) paired with a responsive React + shadcn frontend. The entire backend is containerized with Docker and orchestrated using AWS EKS, with an AWS ALB and API Gateway acting as the secure front door for all incoming API traffic.
For data persistence, I hooked up AWS RDS (MySQL) to handle application states, while moving all media storage out of the database and into AWS S3. Finally, to ensure the frontend loads instantly for users, the static React builds and media assets are cached globally and served via an AWS CloudFront CDN distribution.
Diving into the Development
Developing the system was a step by step process. Main Steps of the development process were:
- Setting Up the database (MySQL and AWS S3)
- Building the Microservices
- Developing the Frontend
- Setting Up AWS Infrastructure
- Push Images to ECR
- Setting up EKS Cluster
- Deploying Microservices to EKS
- Configuring API Gateway and Load Balancers
- Implementing CDN for Static Content Delivery
1. Setting Up the database
As the primary database for the application I choise mysql with AWS RDS and for the media storage I choise AWS S3 which is an object storage service. I also set up a AWS CloudFront distribution to serve the media content with low latency and high transfer speeds.
I set up Rds instance with mysql engine, created a database and a user with necessary permissions.
we can connect to the RDS instance using the endpoint, username, and password by using following command:
mysql -h <rds-endpoint> -u <username> -p
Then I configured the database connection in the spring boot application using the RDS endpoint, database name, username, and password.
2. Building the Microservices
I broke down the system into three core microservices:
- User Service: Responsible for user login, and user management.
- Course Service: Handles course management logic.
- Enrollment Service: Manages user enrollments in courses.
Each service was developed using Spring Boot, with RESTful APIs for communication. I also implemented token-based authentication using JWT to secure the APIs.
You can explore the server-side codebase built with Spring Boot.
3. Developing the Frontend
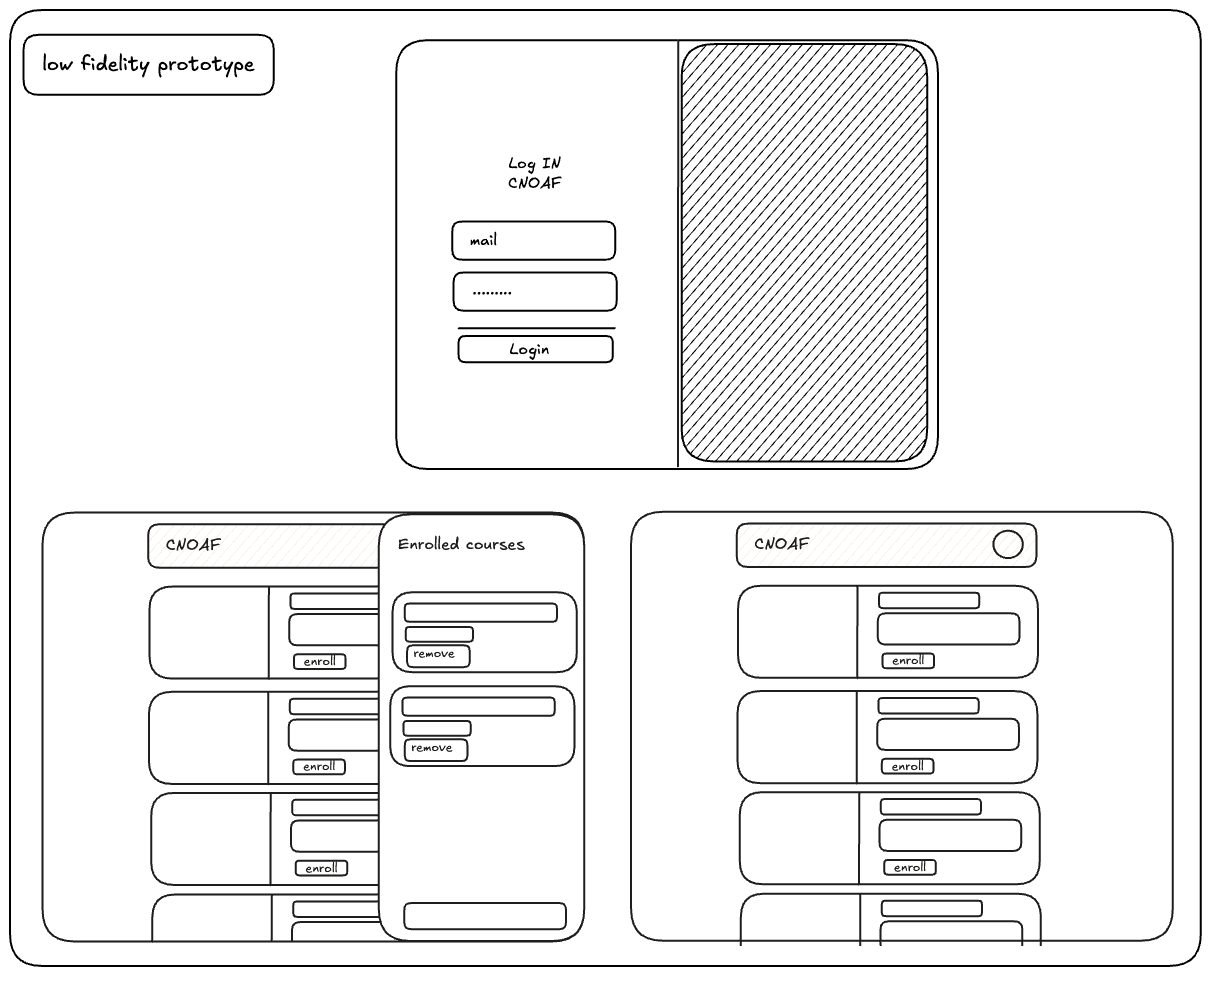
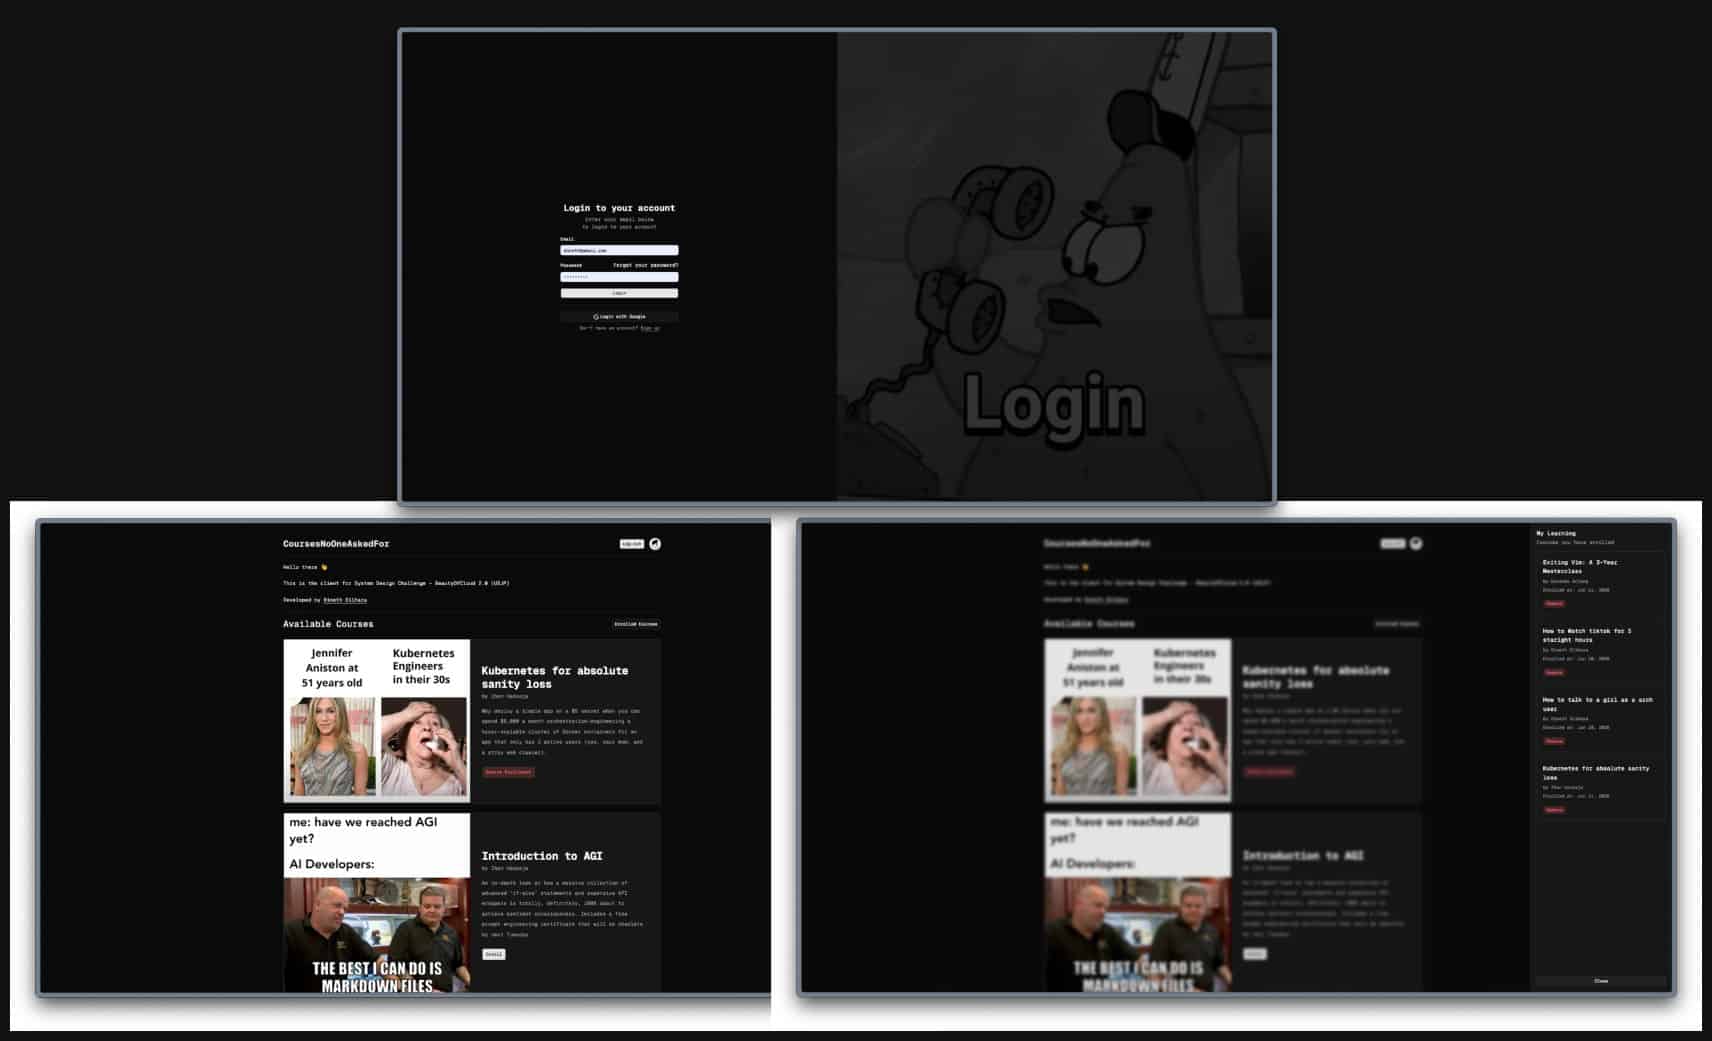
For the frontend, I used React and shadcn to build a simple interface where users can login to their accounts, browse courses, enroll and remove from them, and view their profiles info.
The frontend communicates with the backend microservices through an API Gateway.
low fidelity and developed frontend designs
You can explore the client-side codebase built with React, TypeScript and shadcn.
4. Setting Up AWS Infrastructure
Before working on deployement, I set up aws IAM user with necessary permissions to manage EKS, ECR, RDS, S3 and other services. I also configured the AWS CLI on my local machine to interact with AWS services from the command line.
Install AWS CLI and configure it with the credentials of the IAM user you created. After installing the AWS CLI, run the following command to configure it:
aws configure
This command will prompt you to enter your AWS Access Key ID, Secret Access Key, default region, and output format. Once you have entered this information, the AWS CLI will be configured and ready to use for managing your AWS resources.
Now that the AWS CLI is configured, we can use it to create and manage your AWS resources, such as creating an EKS cluster, pushing Docker images to ECR, and deploying your microservices to EKS.
5. Push Images to ECR
To deploy the microservices to AWS EKS, I first needed to containerize them using Docker. I created Dockerfiles for each microservice, built the Docker images locally, and then pushed them to AWS Elastic Container Registry (ECR).
Step 1: Define Dockerfiles in each microservice
FROM eclipse-temurin:17-jdk
WORKDIR /app
COPY target/user-service.jar app.jar
EXPOSE 8081
ENTRYPOINT ["java", "-jar", "app.jar"]
Define jar file name inside pom file and the test the docker file locally before pushing to ECR.
by following these commands, we can clean target mvn clean, build the jar file mvn package and then build the docker image docker build -t user-service:latest .
Step 2: Push Docker Images to AWS ECR
- Create ECR repositories for each microservice.
- Authenticate Docker to ECR using
aws ecr get-login-password. - Tag and push the Docker images to the respective ECR repositories.
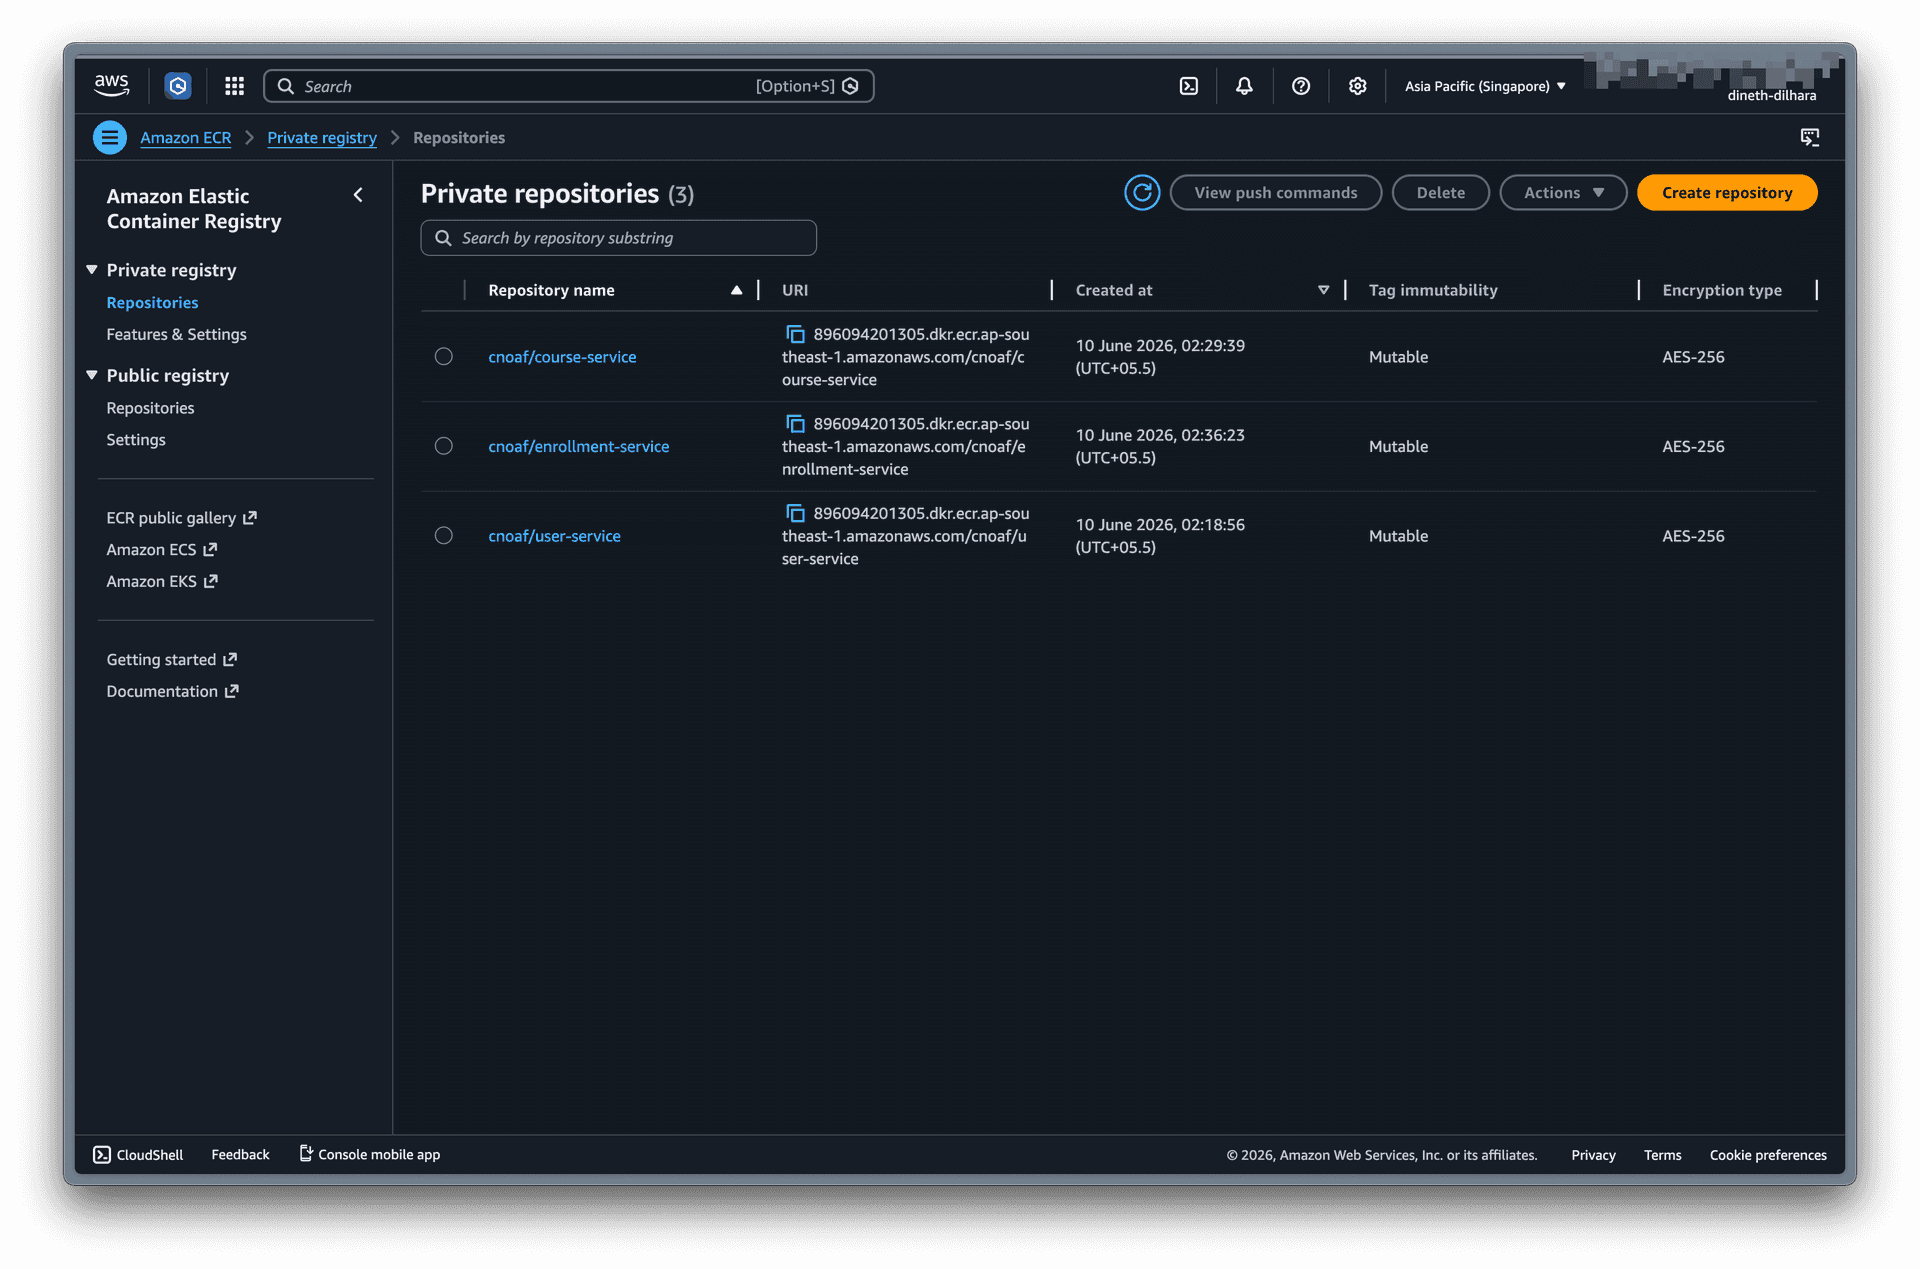
6. Setting up EKS Cluster
EKS is a managed Kubernetes service that makes it easy to run Kubernetes on AWS without needing to install and operate your own Kubernetes control plane or nodes.
To set up an EKS cluster, first install kubectl and eksctl CLI tools. Then, create an EKS cluster using eksctl with the following command:
Change the cluster name, region, node group name, node type, and number of nodes as per your requirements.
eksctl create cluster \
  --name cnoaf-cluster \
  --region ap-southeast-1 \
  --nodegroup-name cnoaf-node \
  --node-type t3.small \
  --nodes 1 \
  --managed
It will take around 10-15 minutes to create the cluster and the worker nodes. Once the cluster is up and running, you can use kubectl to manage your Kubernetes resources and deploy your microservices to the EKS cluster.
Verify the cluster and nodes are running using the following commands:
kubectl get nodes
expected output:
NAME                                                STATUS   ROLES    AGE   VERSION
<ip>.ap-southeast-1.compute.internal   Ready    <none>   33h   v1.34.8-eks-3385e9b
7. Deploying Microservices to EKS
To deploy the microservices to EKS, you need to create Kubernetes deployment and service YAML files for each microservice. These files define how your application should be deployed and exposed within the cluster.
└── eks
    ├── course-service
    │   ├── deployment.yaml
    │   └── service.yaml
    ├── enrollment-service
    │   ├── deployment.yaml
    │   └── service.yaml
    ├── ingress
    │   └── ingress.yaml
    ├── namespace.yaml
    └── user-service
        ├── deployment.yaml
        └── service.yaml
Step 1: Namespace Creation
Create a namespace for the application to logically separate it from other applications running in the cluster.
namespace.yaml
apiVersion: v1
kind: Namespace
metadata:
  name: nameforapp
Step 2: Create Kubernetes Deployment and Service YAMLs
- Define the deployment YAML to specify the Docker image, replicas, and other configurations for each microservice.
- Define the service YAML to expose the microservice within the cluster.
deployment.yaml
apiVersion: apps/v1
kind: Deployment
metadata:
name: user-service
namespace: cnoaf
spec:
replicas: 1

selector:
  matchLabels:
    app: user-service

template:
  metadata:
    labels:
      app: user-service

  spec:
    containers:
      - name: user-service
        image: <aws_account_id>.dkr.ecr.<region>.amazonaws.com/user-service:latest

        ports:
          - containerPort: 8081
service.yaml
apiVersion: v1
kind: Service
metadata:
  name: user-service
  namespace: cnoaf

spec:
  selector:
    app: user-service

  ports:
    - port: 80
      targetPort: 8081

  type: ClusterIP
To apply the deployment and service, use the following commands for each microservices:
kubectl apply -f user-service/deployment.yaml
kubectl apply -f user-service/service.yaml
To verify the deployments and services are running, use the following commands:
kubectl get deployments -n cnoaf
kubectl get services -n cnoaf
kubectl get pods -n cnoaf
expected output:
Step 3: Configure Ingress for External Access
- Create an ingress resource to route external traffic to the appropriate microservices based on the URL path.
ingress.yaml
apiVersion: networking.k8s.io/v1
kind: Ingress
metadata:
  name: cnoaf-ingress
  namespace: cnoaf
  annotations:
    alb.ingress.kubernetes.io/scheme: internet-facing
    alb.ingress.kubernetes.io/target-type: ip
    alb.ingress.kubernetes.io/listen-ports: '[{"HTTP":80}]'

spec:
  ingressClassName: alb

  rules:
    - http:
        paths:
          # USER SERVICE
          - path: /api/v1/users
            pathType: Prefix
            backend:
              service:
                name: user-service
                port:
                  number: 80

          - path: /api/v1/auth
            pathType: Prefix
            backend:
              service:
                name: user-service
                port:
                  number: 80

          # COURSE SERVICE
          - path: /api/v1/courses
            pathType: Prefix
            backend:
              service:
                name: course-service
                port:
                  number: 80

          # ENROLLMENT SERVICE
          - path: /api/v1/enrollments
            pathType: Prefix
            backend:
              service:
                name: enrollment-service
                port:
                  number: 80
To apply the ingress resource, use the following command:
kubectl apply -f ingress/ingress.yaml
To verify the ingress is created, use the following command:
kubectl get ingress -n cnoaf
Step 4: Configure Ingress for External Access with AWS ALB
- Create an ingress resource with AWS ALB annotations to route external traffic to the appropriate microservices based on the URL path.
- Ensure that the ALB is properly configured to handle incoming traffic and route it to the correct services within the EKS cluster.
helm repo add eks https://aws.github.io/eks-charts
helm repo update
helm install aws-load-balancer-controller eks/aws-load-balancer-controller \
-n kube-system \
--set clusterName=cnoaf-cluster \
--set serviceAccount.create=true
eksctl create iamserviceaccount \
  --cluster cnoaf-cluster \
  --namespace kube-system \
  --name aws-load-balancer-controller \
  --attach-policy-arn arn:aws:iam::<AWS_ACCOUNT_ID>:policy/AWSLoadBalancerControllerIAMPolicy \
  --override-existing-serviceaccounts \
  --approve
To verify the ALB Ingress Controller is running, use the following command:
kubectl get deployment -n kube-system aws-load-balancer-controller
Then can get the ALB DNS name from the ingress resource:
kubectl get ingress -n cnoaf
expected output
NAME            CLASS   HOSTS   ADDRESS                                                                    PORTS   AGE
cnoaf-ingress   alb     *       <ALB_DNS_NAME>.ap-southeast-1.elb.amazonaws.com   80      51m
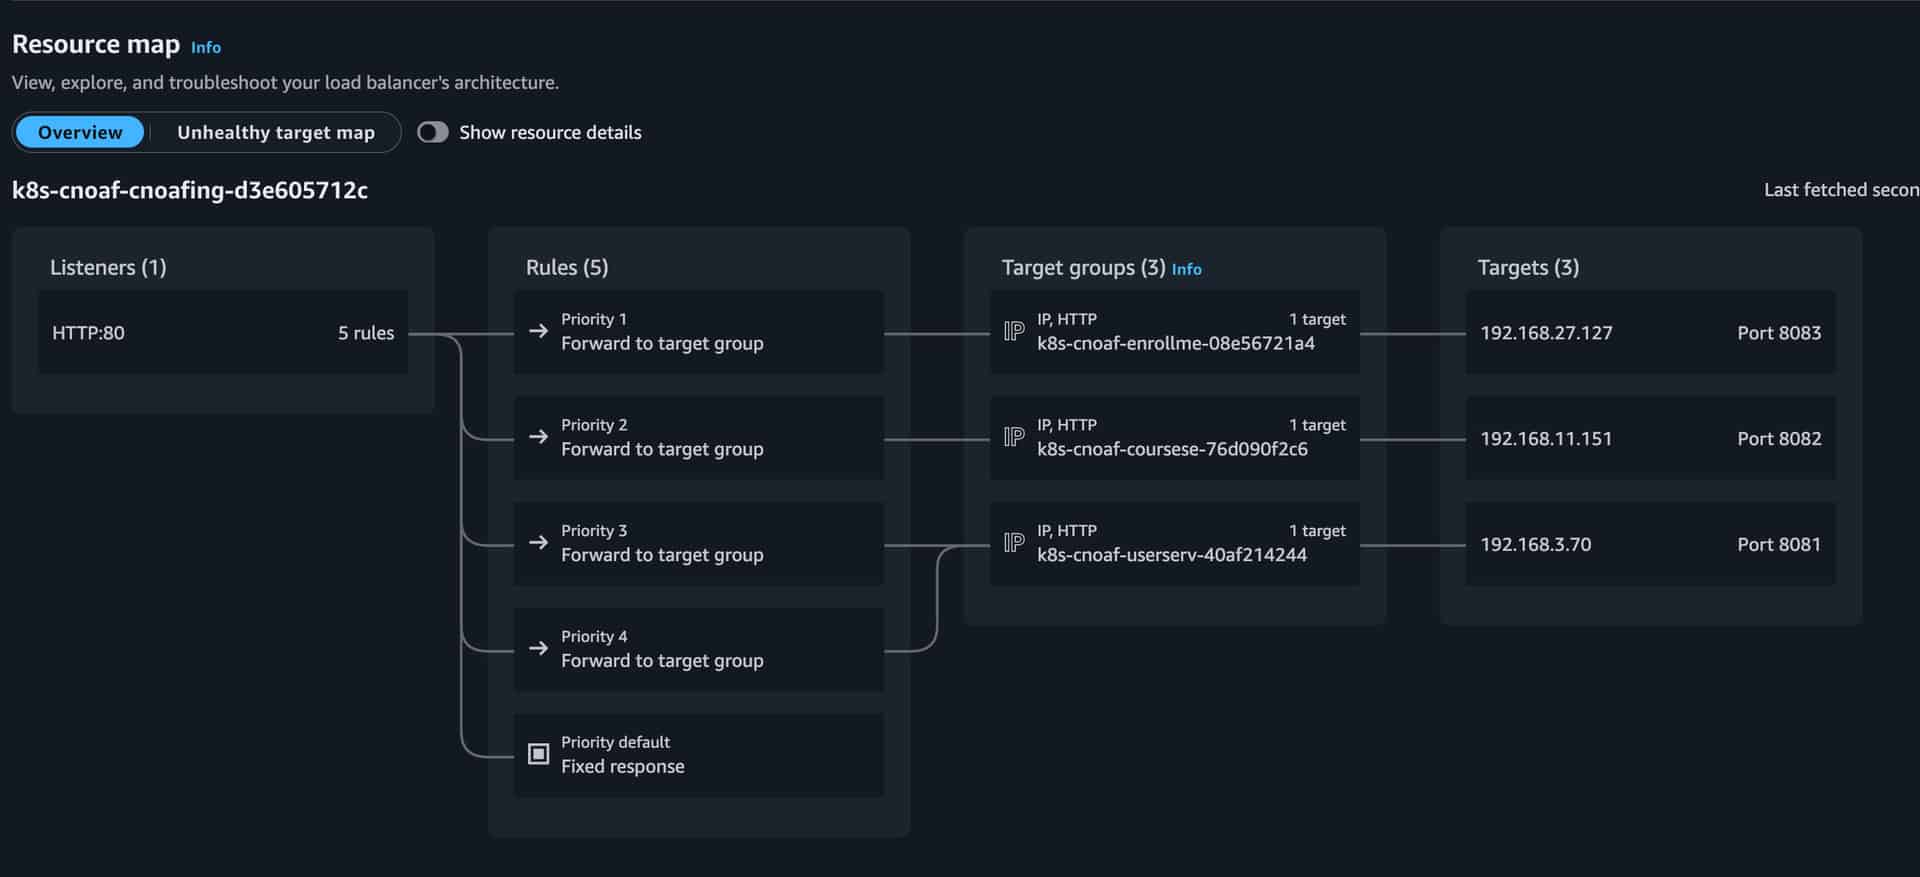
Then you can access the application using the ALB DNS name followed by the appropriate path for each microservice.
8. Configuring API Gateway and Load Balancer
However, even though the ALB is handling the routing of traffic to the microservices, it is still important to have an API Gateway in place to manage and secure the APIs. The API Gateway can provide features such as authentication, rate limiting, and request/response transformation.
To set up an Api Gateway in aws, you can use AWS API Gateway which is a fully managed service that makes it easy for developers to create, publish, maintain, monitor, and secure APIs at any scale.
Step 1: Create an API Gateway
- Go to the AWS Management Console and navigate to the API Gateway service.
- Click on "Create API" and choose "HTTP API" for a simple setup.
- Provide a name for your API and click "Create".
Then you can create routes for each microservice and integrate them with the ALB. For example, you can create a route for the user service with the path /api/v1/users and integrate it with the ALB target group that points to the user service.
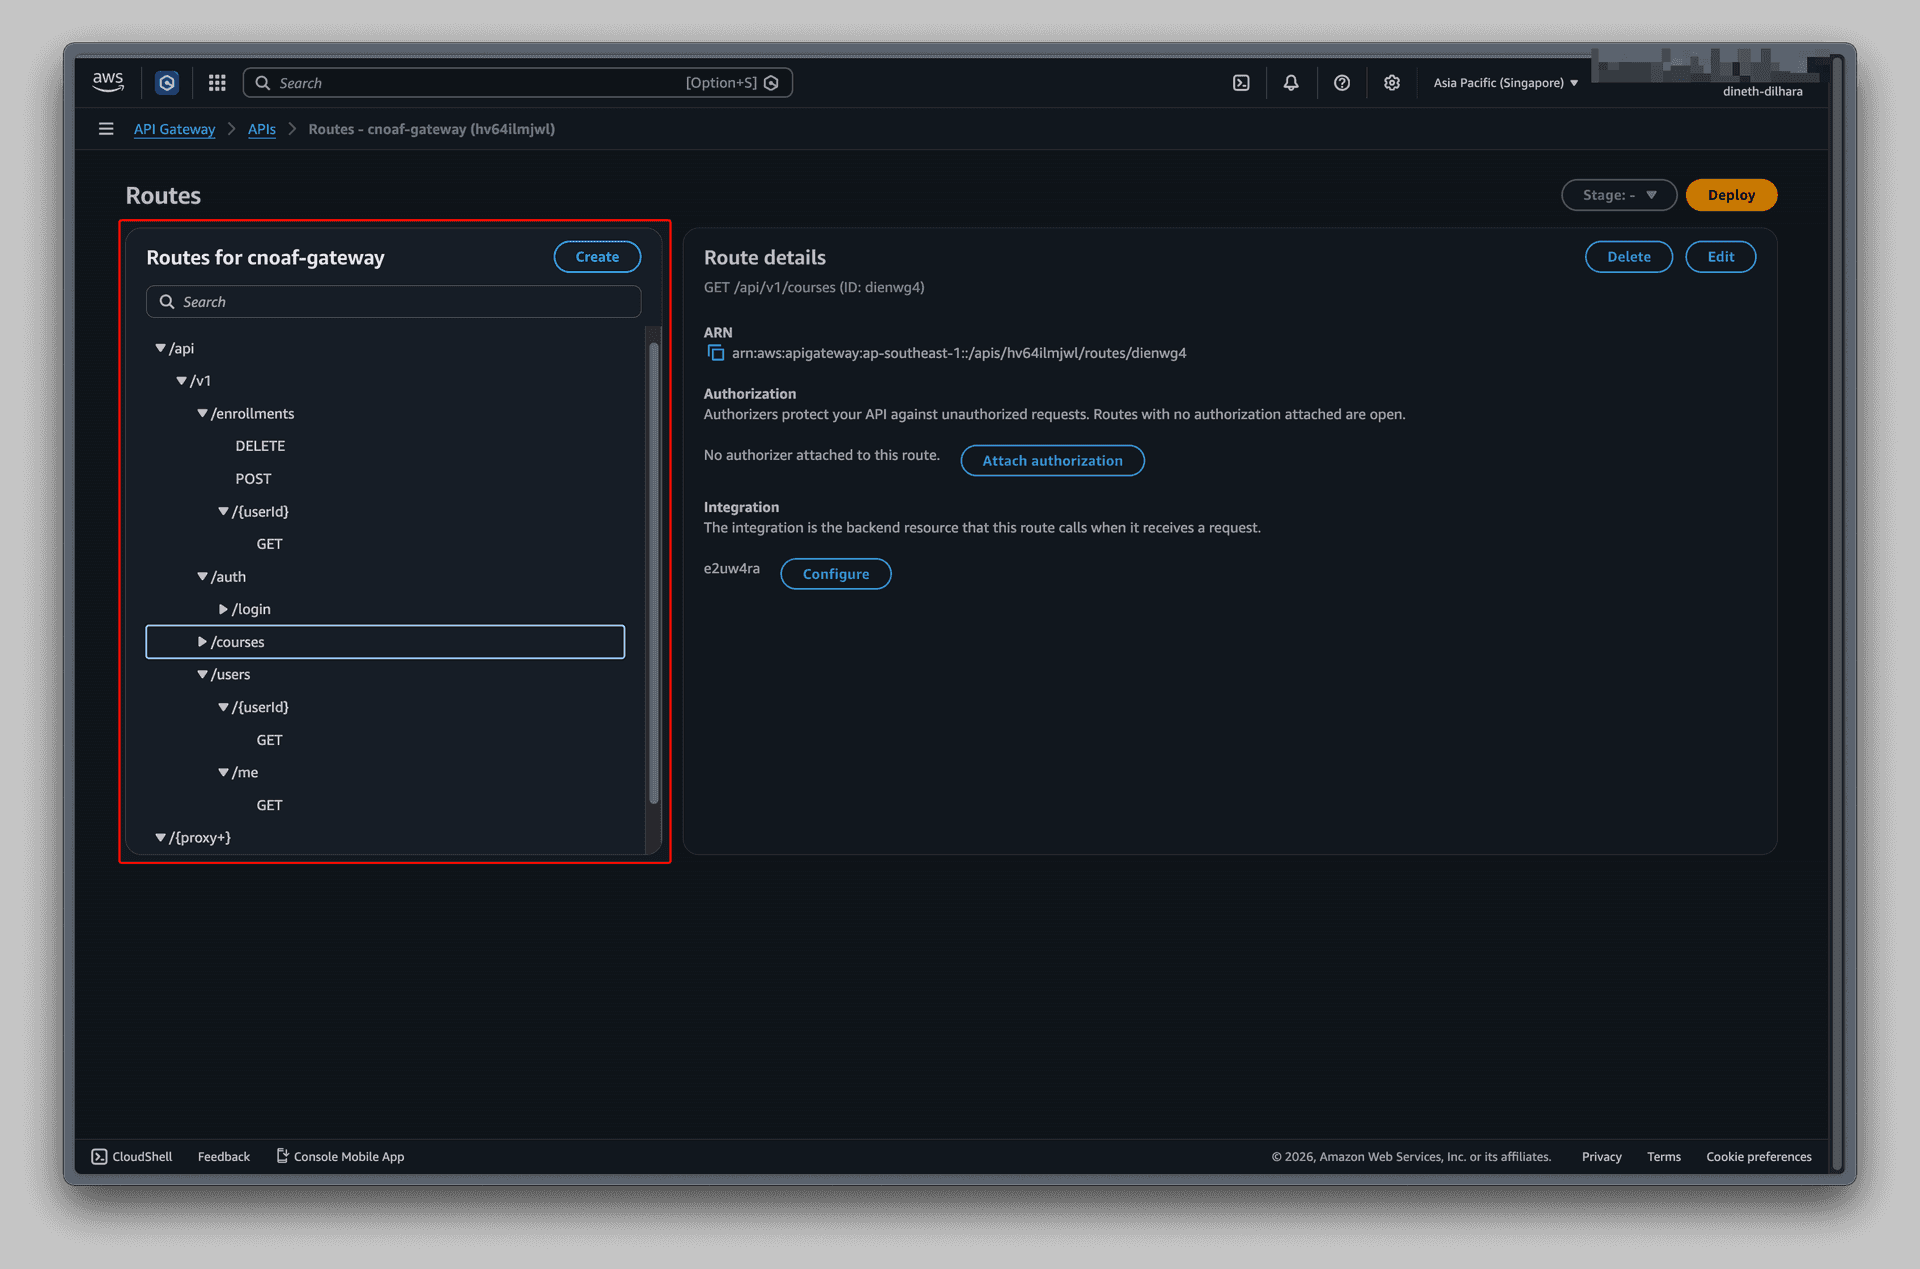
Step 2: Deploy and Test the API Gateway
- After setting up the routes and integrations, deploy the API to a stage (e.g., "prod").
- Test the API endpoints using tools like Postman or curl to ensure that they are correctly routing to the microservices through the ALB.
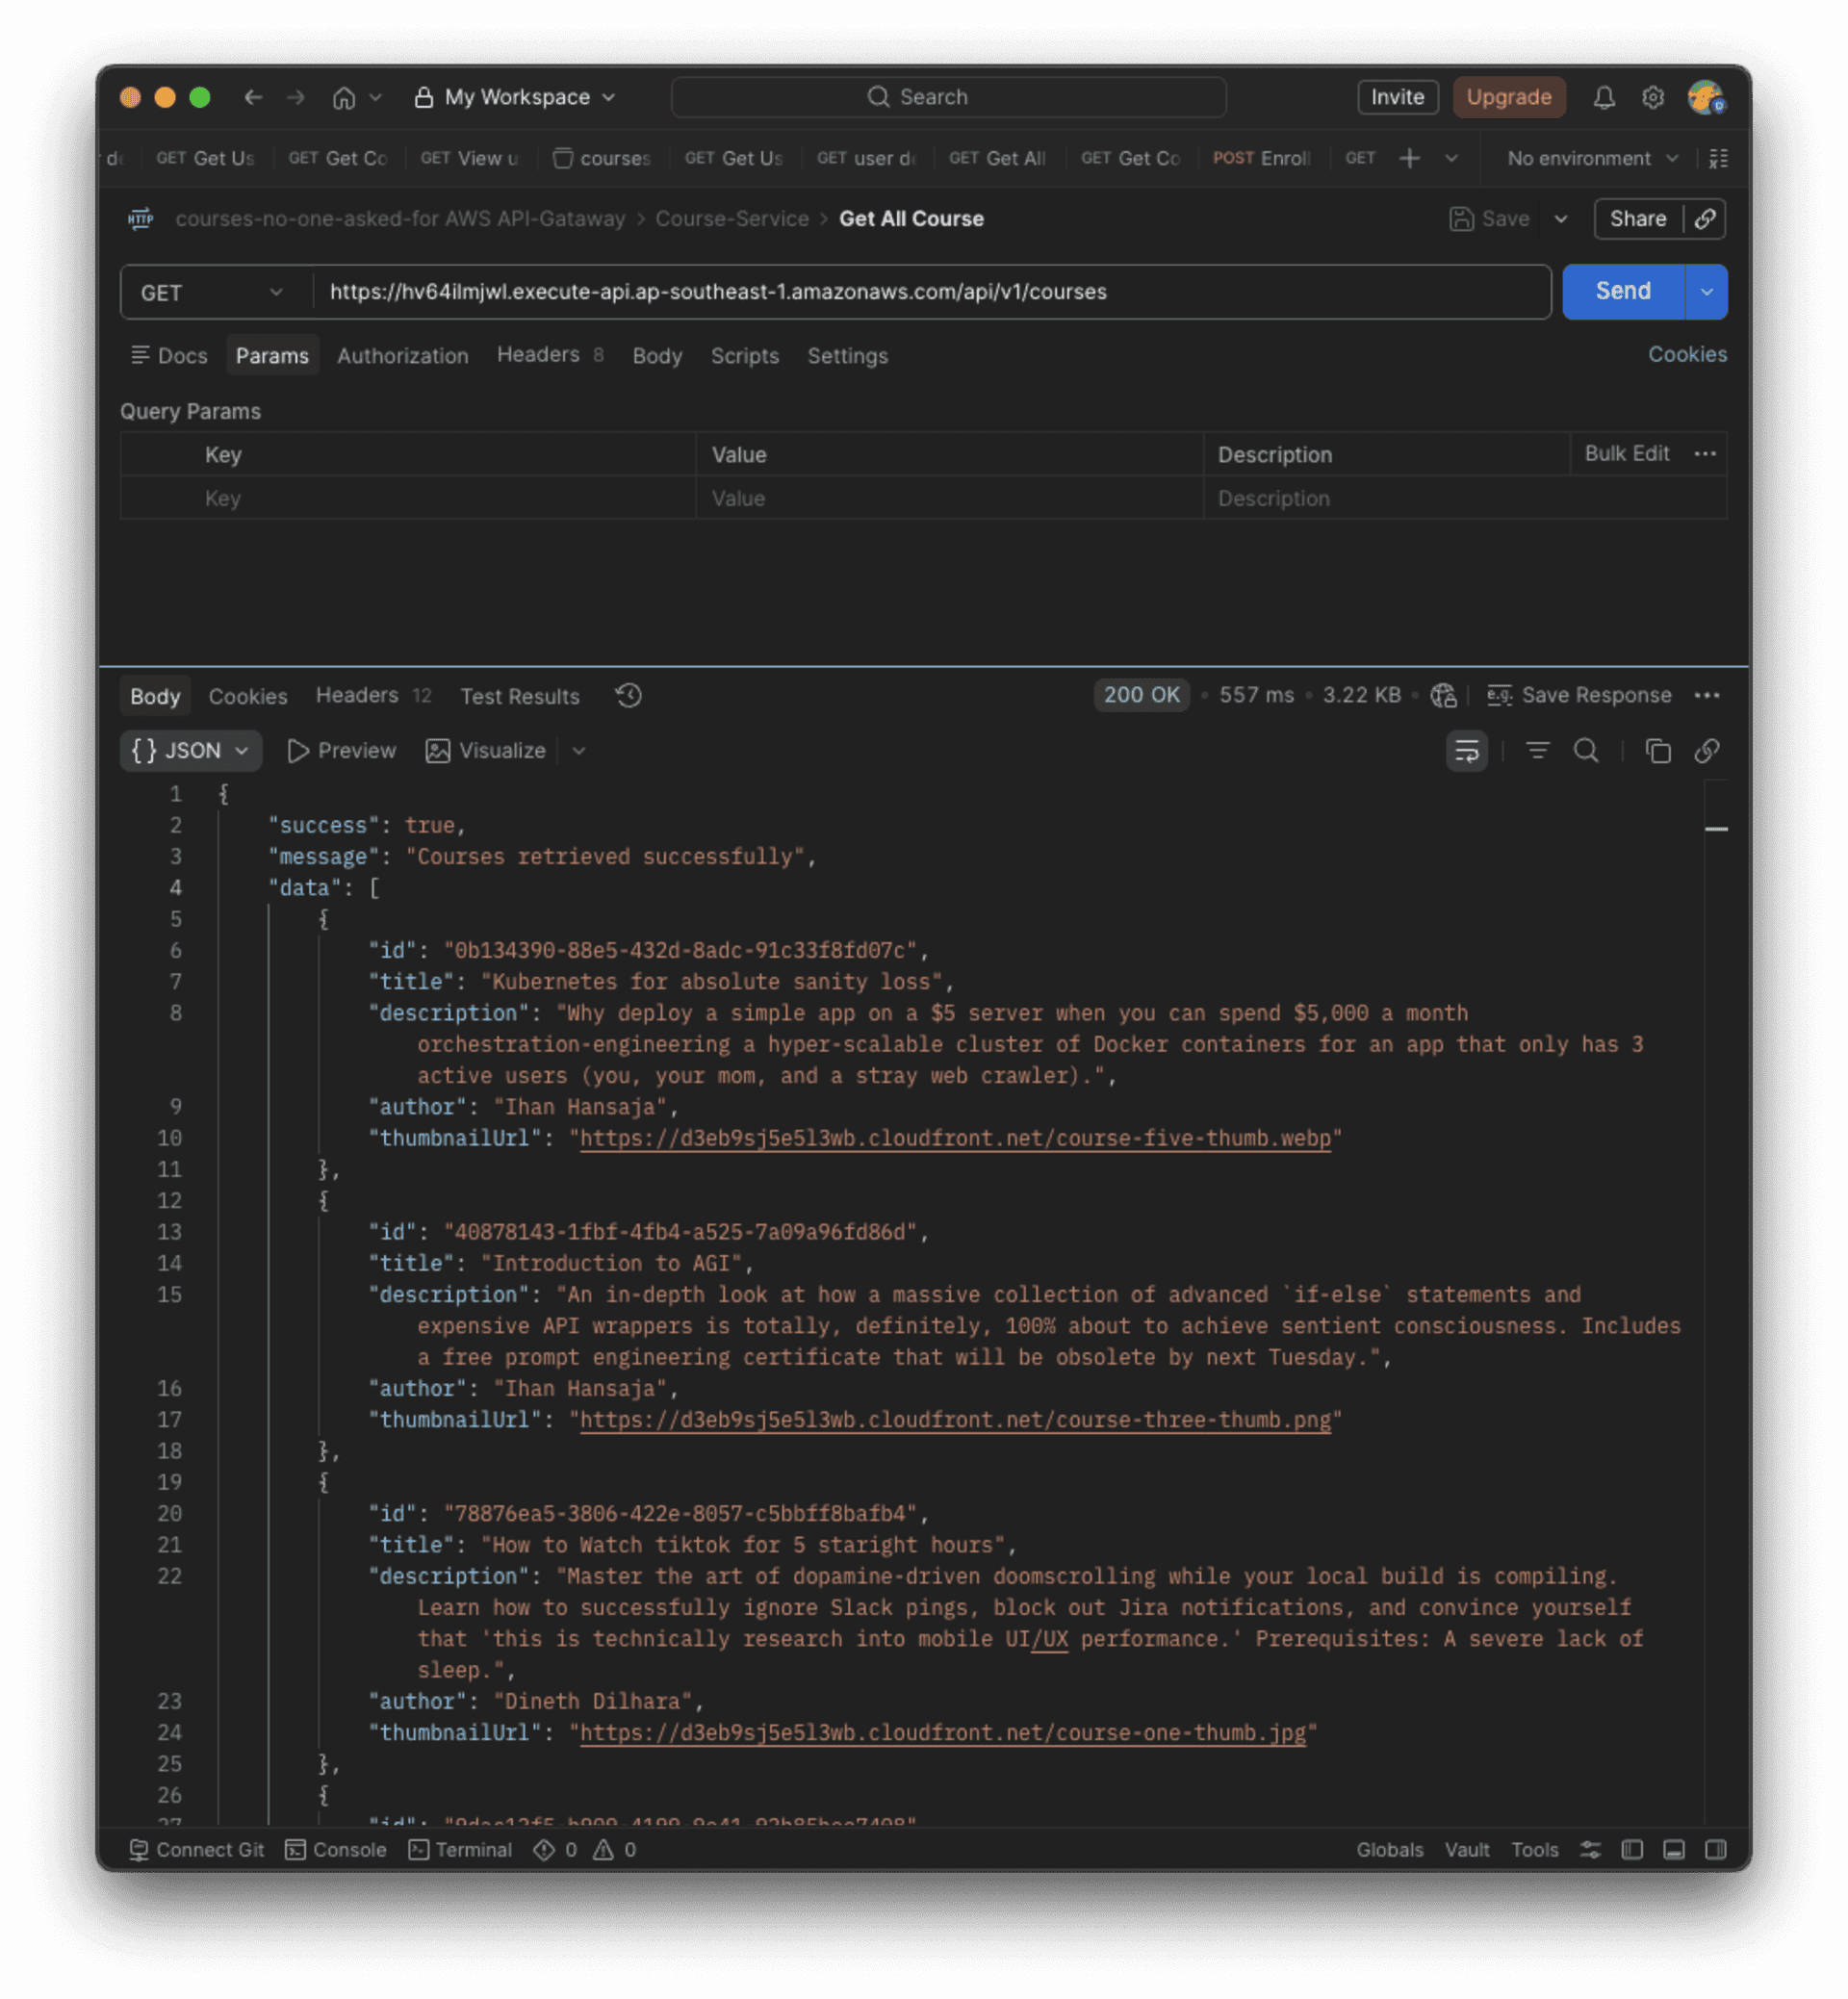
After setting up the API Gateway and ensuring that it is correctly routing traffic to the microservices through the ALB, you can also configure additional features such as authentication, rate limiting, and monitoring to enhance the security and performance of your APIs.
So now we can get the API Gateway url and complete the final touch to the frontend to connect with the backend services through the API Gateway.
You can explore the infrastructure codebase containing Kubernetes deployment resources.
9. Implementing CDN for Static Content Delivery
After connecting the frontend with the backend services through the API Gateway, the next step is to implement a Content Delivery Network (CDN) to serve static content such as images, CSS files efficiently.
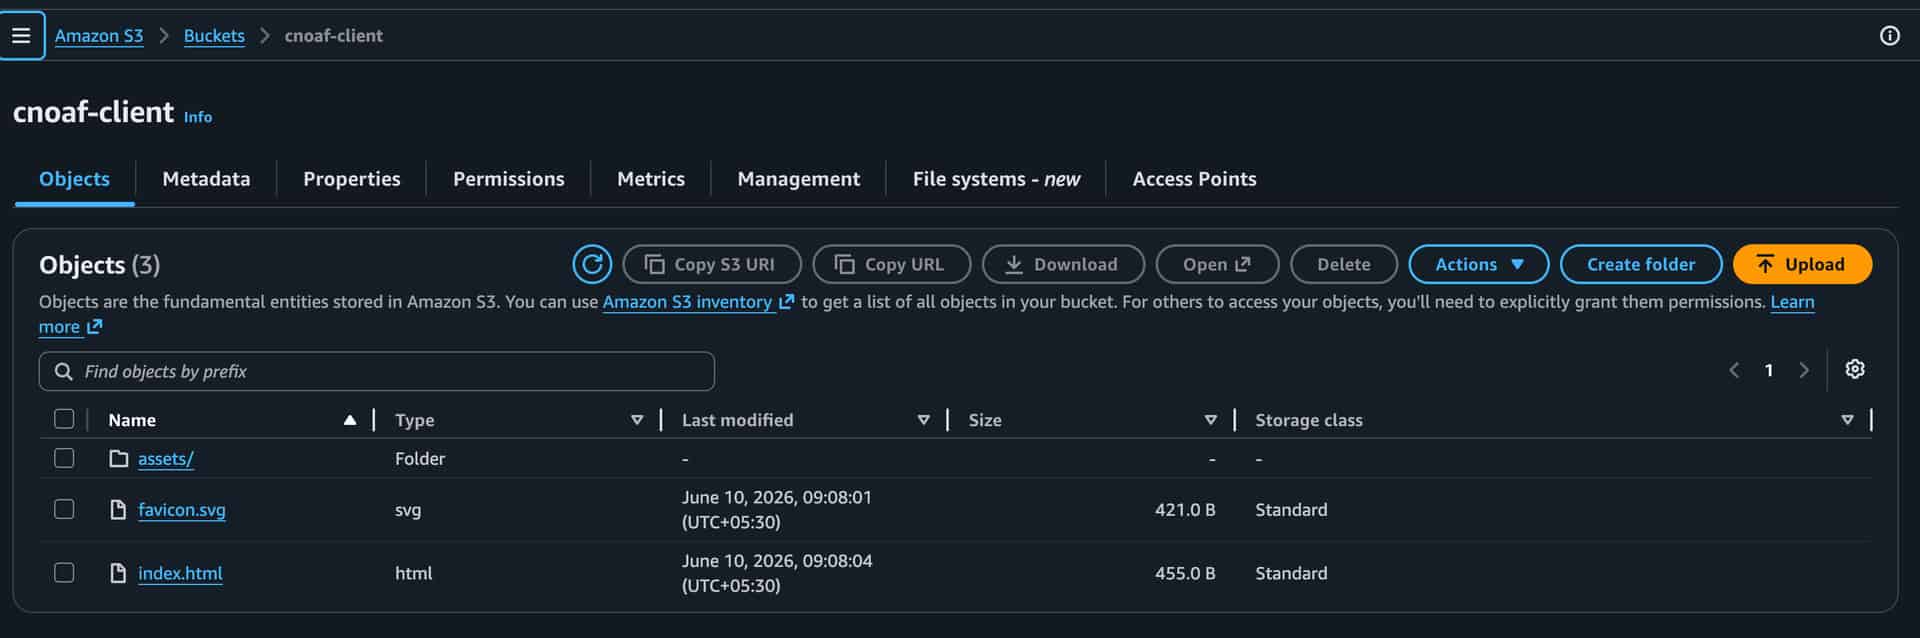
Step 1: Finalize Static Content and Upload to S3
- Since I was using react + vite for the frontend, I built the frontend application using
npm run buildwhich generates adistfolder containing all the static files. - Then create an S3 bucket in AWS and upload the contents of the
distfolder to the S3 bucket.
Step 2: Connect S3 Bucket to CloudFront Distribution
- Create a CloudFront distribution and configure it to use the S3 bucket as the origin.
- Set up the necessary cache behaviors and permissions to allow CloudFront to access the S3 bucket.
Now you can access the static content through the CloudFront distribution URL, with configured path pattern.
Trade offs and Challenges
Trade-offs: Since this applicaion mainly focuses on cloud architecture, I kept the application logic simple and decoupled the services to focus more on the infrastructure and deployment aspects of the challenge.
The Challenges: Figuring out the networking layer was a total brain melter. I ended up routing traffic from the frontend, through an AWS HTTP API Gateway, which then forwards requests to the AWS ALB Ingress Controller inside EKS, before finally hitting the actual pods. While this double-routing layer gives me awesome API management features (like rate limiting or unified auth) down the line.
Conclusion
A special thank you goes out to Mr. Savin Kodithuwakku for posing this challenge. Navigating those architecture hurdles under such a tight deadline was tough, but it's exactly what inspired the insights that brought you all to this blog post today. I am also incredibly grateful to the BeautyofCloud 2.0 team for organizing this entire series. it has been a fantastic roadmap for both myself and my colleagues.